The Apple Macintosh Experience
by Eric Buczynski
Why do some PC users dislike the Macintosh, even those who have never used one? There have been Mac vs. PC wars ever since the Macintosh became prominent in the marketplace. Even you may be asking yourself, "What is the big deal about Macintosh anyway when the majority of users out there are PC users?" I'm here to explain how a Mac works so you can see for yourself how much better it is over using a PC. Each machine has it's pros and cons, and there's absolutely nothing wrong with using a PC. I wouldn't mind having a Windows machine so that I can play older pinball games on it using a program called Visual Pinball; only because that program has never been released on the Macintosh. However, having used Macs since 1993 I am biased. In this article I'll show the different features of the software, the hardware, compatibility, and more. I'll be adding things to it down the line as well. A major difference in the two platforms is the time it takes to boot the machine. For those who use Windows I ask this: How long do you usually have to wait between the time you start the machine until the time comes when you can actually select programs and files? | ||
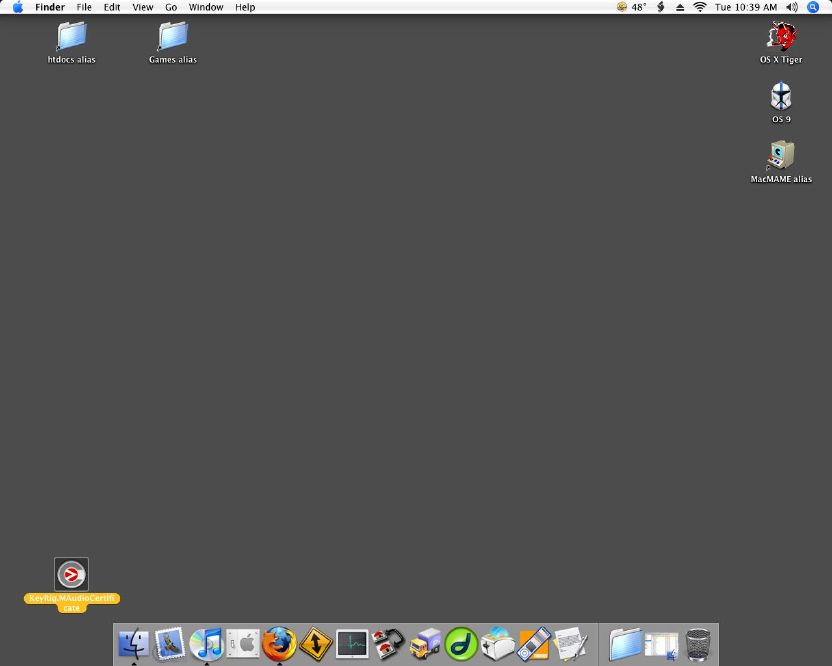
Let me first start out by showing a graphic of my desktop (shrunk down a bit for space and file size optimization). Here's where you spend most of your time (unless you're playing games that use the whole screen). Every so often I'll have a fancy desktop background, but I just have a gray one for now. It's especially helpful for this demonstration. Starting from the upper left hand corner is the menu bar. The two folder icons are just shortcuts that I have since I use those frequently. All the way to the right on the same menu bar are menulets. The Windows operating system has similar icons which can be changed by the user. Underneath the menulets are hard disk icons (except for the MacMAME alias which is a shortcut to a game). At the very bottom is the dock which is used to store shortcuts of frequently used programs and documents. Click on the picture of the desktop and it will open in a bigger, easier-to-see window with an explanation of each graphic. |
DETAILS OF EACH SECTION:
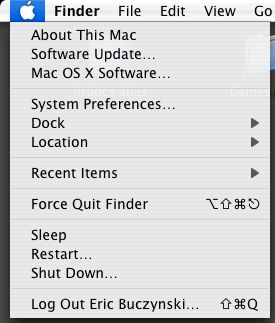 | Here is the menu bar for the Finder. The Finder is the name of the Macintosh desktop. This particular menu selection is called the Apple Menu, as noted by the shape of the Apple. Going left to right you have the Finder menu, File menu, Edit menu, and so fourth. Click the following links to see a pop-up window of the item: The first set of entries are the About This Mac, Software Update, and Mac OS X Software. The About This Mac window displays the current operating system being run, the amount of RAM (memory) installed, the cache size, and the Startup Disk where the operating system is located on. This is listed as Macs, like all computers, can have multiple hard disks, each with different operating systems. The Software Update... selection brings up a window that searches the Apple database for any current versions of Apple software. This does not apply to third-party software or drivers. The Mac OS X Software... selection brings you to the Apple downloads site where you can find some of the latest Apple and third-party software out there. The System Preferences selection is similar to the Control Panels in Windows. (Clicking the link will take you to the System Preferences page). The Dock menu lets you change how the dock behaves in appearance and where it appears on the screen (left, bottom middle or right). Click here to be taken to the page describing the Dock. The Location menu gives you a list of network locations as set up in the System Preferences screen. This is especially helpful for laptops; as you can set one location for your home network settings, then a different location for a network at your workplace. The Recent Items menu show your last used programs; and the number of programs listed can be set under System Preferences. Because Mac OS X runs under UNIX, the operating system lets you quit the Finder without having to reboot the whole machine; as noted by the "Force Quit Finder" selection. The next three selections allow you to put your Mac to sleep, restart it or shut it down. The last selection logs out the current user and allows another user to log in. |
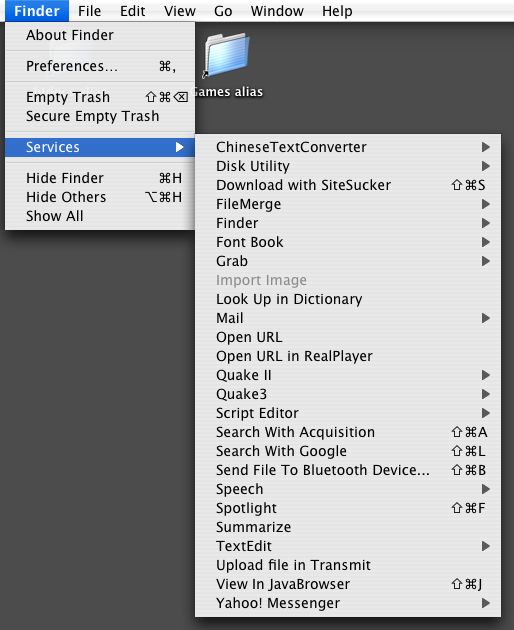 | The Finder is a program in itself, and here is the Finder menu. Here you can get info of the Finder and set preferences relating to the program. Next you have the "Empty Trash" and the "Secure Empty Trash" selections. These choices allow you to either just delete an item you no longer use, or overwrite a file location multiple times for items you don't anyone else to discover were there. Then we have the Services Menu. Here you have a wealth of options at your disposal. Unlike having to highlight something first then use the cut, copy or paste menu; here you can have the computer perform the selected action. Some of these options have further menus as indicated by the arrow right of the choice, although some of those next choices are grayed out. The Grab menu allows a screen grab, but you have to click and drag a square area first. The Quake II menu allows you to connect to a Quake II server right away without having to manually start the program, then choose a specific server. Some of the options are standard from the Macintosh operating system, but others options are automatically installed upon installing a third-party program. The last two selections let you hide everything else except the desktop, or show every window open with every program open. The Macintosh just makes things easier and faster. Overall it allows you to do simple tasks with only one or two mouse button pushes. Usually with Windows these same tasks can only be done by going into different menus and programs, which obviously require a lot more button pushing. |
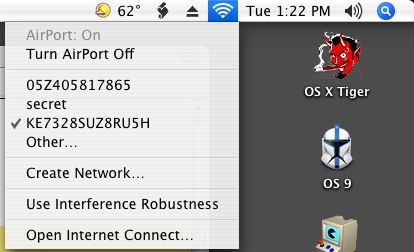 | Here are menulets on the upper right-hand of the screen, similar to those on Windows which are on the lower right-hand side of their screen. Left to right are icons for Meteorologist (third-party program), common scripts (similar to the services menu), CD/DVD Eject, wireless info, clock, volume, and spotlight (Mac OS X search tool). In this screenshot I have the wireless info selected. I can turn the Airport (Apple's terminology for wireless networking) off and on, select from a variety of wireless networks that the card picks up, create another network and more. Although it shows other networks that I can pick up, not all of them are open. That means if my neighbor also has a wireless network, I can hitch a ride on their signal. But if they have it secured by a password, I can't use the same signal unless I supply the password for their network. The picture edges look a bit distorted but that's only because these pics are in .jpg format. The actual graphics are much smoother though. Notice the transparency behind the menu? |
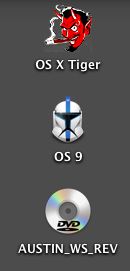 | Here are icons of the disks being used. The first two are hard disks while the one at the bottom is a DVD (Austin Powers). The great thing about the hard disks is that you can name them what you want instead of just C: and D:. The user can choose an icon to represent the hard disk instead of a generic Windows icon. Another great features is that whenever you insert removable media into the Mac; it shows up on the desktop right away. On the PC, you have to go into My Computer to see if it has shown up or not. FYI, the first icon is a famous devil head by Chris Cooper also known as Coop, and the second icon is a helmet of a Star Wars clone trooper lieutenant. Click here to be taken to Chris Cooper's website. |
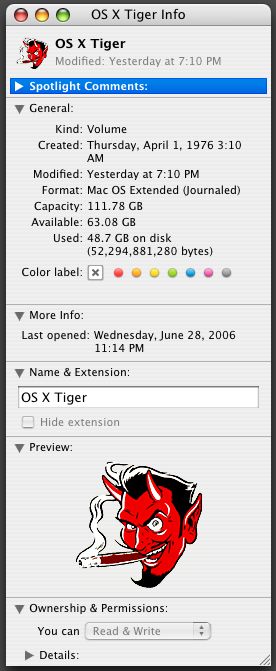 | Using the Get Info command by selecting the command from the menu bar or right-clicking the icon, I can bring up the following graphic. It shows the name of the icon and other helpful information. Each subject can be shown or hidden by selecting the gray arrow. Under General, it shows that it's a volume. That's another way of saying that it's not a file, folder, or application. It also shows a false creation date (in this case, set when there was a freshly installed backup battery), the modification date, the format it's in (Macintosh OS Extended, as there are other Mac and UNIX formats available), how much data it holds, available free space, how much of the disk is used, and color label. Labels are more practical for files and folders, but I label certain files by placing them in different folders rather than using a color label for them. The name and extension can be changed from this screen also, but it can be changed simply by clicking on the name of the icon twice. The preview gives a larger icon representation, but like any graphics this can be dragged to the desktop where it cane be saved or edited using other programs. At the top left hand of this window it shows a smaller version of the icon. It is here where the user can paste another icon to represent this disk, or copy this icon to another file, folder, application or disk. For some reason, copying the icon from the preview doesn't work. It only works by copying the smaller icon on the upper left hand corner. Below the preview lies the ownership and permissions box. Here I can set whether I, the user, can read and write to it, read only, or do not have any access to it whatsoever. The same permissions are also available to the system (to read and write to the hard disk for upgrades and such) and to other users (if I were connected to a network). It would make no sense to block myself out from reading or writing to it, so I can't change that. Notice the slight shade underneath the bottom edge of the window as well. |