Please, see the Terms of Usage on the Sets page for use of graphics. Tutorials may not be reproduced without express written permission of the author.


Gold Filigree

In this tutorial, we will use Paint Shop Pro and Blade Pro to do the following:
- On the first page, we created "gems" with fairly simple facets, but clearly distinguishable pavilion cuts.
- On the second page, we explored how to create the texture found on this set in both a light and dark version. This will employ the use of the "hue map".
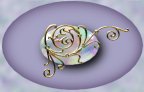
- On this page, we look at ways of using Blade Pro to make metallic decorations from very "thin" dingbats.
| Step 1 | Open a new image. I used 100 x 100 with a white background. |
| Step 2 | Add layers
|
| Step 3 | Flood fill the Fill layer with the desired background or pattern. |
| Step 4 | Go to the Top Dingbat layer, and lay down the dingbat. (I used Davy's Dingbats "*" with a size of 48.) Have floating checked, but anti-alias unchecked. Move the selection into the position you want. Save the selection to the alpha channel as "Dingbat". |
| Step 5 | Apply the Blade Pro "gold, basic" preset. At this point, the dingbat doesn't look like much. There are just not enough pixels there to get a good bevel. However, there is quite a bit of detail. Turn off visibility for this layer. |
| Step 6 | Go to the Bottom Dingbat layer and reload the Dingbat selection. Expand this selection by 1 pixel and flood fill with white. |
| Step 7 | Again, apply the Blade Pro "gold, basic" to this selection. You may want to increase the radius a bit to get more highlights. |
| Step 8 | Turn the visibility for the Top Dingbat layer back on. The difference is subtle, but it does give you the definition of the fine detail that was lost when the selection was expanded. |
| Step 9 | If you want to have a gem in the setting, you have several choices:
|
| Opt. 1 |
|
| Opt. 2 |
|
 This in itself, looks pretty good.
 You can turn on the Top Dingbat layer, if you chose.
 This is a slightly different look which is also appealing.
 For this, I lightened the top layer by 100%. I like this
best.
For this, I lightened the top layer by 100%. I like this
best.

