| Step 1 |
 |
| Create a background layer. The one I used is 300 x 300
pixels. (This has been reduced, in the tutorial to save on download time.) You can
add detail later, but I decided to put that little cutout design on it. You need to
strike a balance between too much and not enough detail in the background. |
 |
|
| Step 2 |
|
Drop some text on the image. I used "G" from monotype
sorts. Check floating and anti-alias. I don't think the color really matters. What
matters is the kind of image you use. It needs to be either a dingbat or 1-bit GIF with an
outline and an "interior". This is going to be the "frame" for
the stained glass. |
| Step 3 |
|
 |
Now apply BladePro. I used "gold, basic" from the
settings. As I refine this technique, I want to get a leaden look. Promote
this floating layer to a layer. I called it "Gold Frame". You
don't really need to do this step at this point, but I like to be able to turn the frame
on and off to get an idea of where I'm heading.
|
|
| Step 4 |
|
Make Background the active layer, and insert a new layer. I called
it "Bevel", because this will, eventually, be the bevel of the glass edge. At
this point, I hide the other layers so that I can better see what I'm doing. |
| Step 5 |
|
Flood fill this layer with a solid color. This is the
color of the glass. I chose blue which is R=0, G=0, B=255. I still have more playing
around to do, but I think that deeply saturated but pure colors work the best. (I still
think in terms of the color solid, and admit that I remember HSL settings better than RGB.
<sigh>)
|
| Step 6 |
|
Drop the same text, in the same position on the Bevel layer.
Make sure that "anti-alias" is unchecked and that floating is checked.
It doesn't matter what the text color is as long as it is different from the flood fill
color of Step 5. Now, deselect the text. |
 |
|
| Step 7 |
|
 |
With the magic wand, select only the central blue portion. Invert
the selection, and clear this inverted selection. Invert the selection, again, and you
should be left with just the interior blue area. (If someone has a
simpler way of doing this, I'd appreciate the hint. The whole point is to get the
inner portion of the graphic.)
|
|
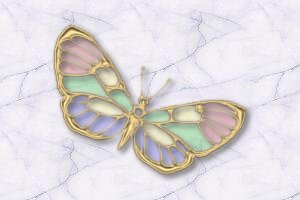
| Note 1 |
|
| At this point, you may want to turn the other layers back on to
see what you have. Play around with the opacity of this layer, and you'll see that you
pretty much have the effect of the butterfly. In that case, I did a few more selections of
the different areas and flood filled them with different colors. I think the butterfly is
pretty, but it looks more like a transparent film than stained glass. |
 |
|
| Step 8 |
|
 |
With the blue diamond still selected, apply BladePro using
stained-glass-a.q9q For the fun of it, try to vary the opacity of this
"glass" you just created. Getting the right transparency in the middle,
tends to mess up the bevel. I was quite frustrated, at this point. But then I got a
"brainwave". I made this setting with no texture, and that meant that the
"face" was a single color. Bingo!!!!
|
|
| Step 9 |
|
| Deselect the diamond. Then use the magic wand to select the
central portion. This happens to still be 0,0, 255. Now you have a new selection
which is only the face. Cut this out, leaving behind a layer which is just the
bevel. (I turned the frame back on to see how it all looked.) |
 |
|
| Step 10 |
|
 |
Paste the cutout selection as a new layer; you may need to
nudge it into position. Now, you can vary the opacity of the bevel and the face
independently. Yahoo!!! I use about 95% for the bevel and about 80% for the face.
Play with it to see what suits. You can stop here, or ... |
|
| Step 11 |
|
The face looked a bit to flat. Keeping the face
selected, I apply BladePro with setting stained-glass-b.q9q. I used a bumpy
texture, but there are plenty more which would probably work well. |
 |
|
| Step 12 |
|
 |
Since the effect is meant to be a piece of glass above the
background surface, I deselected the face, made the Gold Frame the active layer and added
a drop shadow to suit. |
|
| Note 2 |
|
Forward Work: I had my family critique this effect, and they
made some good observations. As a result of these discussions, I think the following
improvements are in order:
- The glare on the lower RHS is too much. I need to twiddle the
stained-glass-a.q9q setting. This should be an easy one.
- The face could use some glare. I think I know how to implement this
without too much trouble, but it will require a few more "arcane" steps.
- There isn't the right kind of distortion of the background image through the
glass. I might be able to use the face texture BMP to selectively soften the
background. Also, the image should "bend" with the glass ripples.
This effect is going to take some pondering. I appreciate any and all help in any
area of this tutorial.
|
| Note 3 |
|
| As noted above, the butterfly was achieved by implementing Steps
1-7. I started with the 1-bit GIF shown at right. The gold frame was achieved
by using the Satin technique at APS Webgraphics. I used
that white marble from the Corel clipart collection for the background. The
butterfly GIF came from Art Today. |
 |
|
|
|
| Comments are appreciated. |
|
This page was last modified on 08/28/98 05:13 PM CDT
|
|