All graphics on this site are copyright © 1998 by Dr. Jo Ann/Visual Sonnets.
Please, see the Terms of Usage on the Sets page for use of graphics.
Let me start out by stating some of my constraints when I design a border background:
I don't want any horizontal tiling, so I make it 1280 pixels wide. (Yeh, yeh, I should go to something even higher, but I figure that is good enough.)
I place my text and graphics in a table which is 600 pixels wide. This is because most of my audience has their monitors set to 640x480. No, this is not how mine is set, but it is pointless to design a page that one knows most of one's viewers will have to scroll right and left for.
Given 2. above, I try to keep the border to 100 pixels or less so that I still have some room left for other graphics and text. So, I have a table which is 600 wide with two columns set to 100 and 500 pixels. OK?
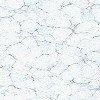
| Step 1 | Chose a seamless tile texture for the left hand border. Note its vertical height. (If you want, you can skip this step and just use a solid color, but for a tiny bit of additional work, you get a much better result.) |
| Step 2 | Open a new image which is at least 1280 pixels wide and of a height 3
times the height of the texture you plan to use. (You'll see the reason for the
height, in a bit.) Make the color something which coordinates with the texture, but
still allows for text placed on it to be readable, etc, etc. Here is the texture I
used for this tutorial. It is 100x100, so I opened an image which is 1280x300 with a
white background.
|
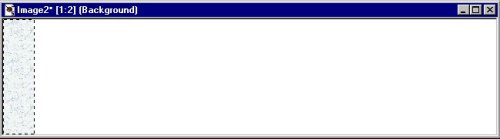
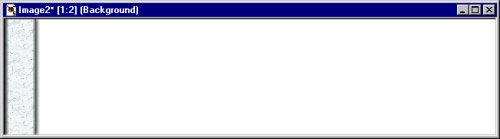
| Step 3 | Use the selection tool and select a rectangle which is the full height and
about 80 pixels wide. Flood fill this with your texture. Because the image is
3 times the height of the texture, it should seamlessly tile 3 times in the vertical
direction.
|
| Step 4 | You could just add a drop shadow, now, but I like to buttonize the selection to give it more dimensionality. I made the background swatch black and the foreground swatch dark grey. The button has a transparent border with a width of 10, and an opacity of 80. The height can't be reduced below 1, which is the problem which lead me to this technique to begin with. Here's what it looks like after buttonizing . |
| Step 5 | Now, you can add a drop shadow. I used a black shadow with opacity
set to 60, blur set to 10, vertical offset 0 and horizontal offset 5. I like using
the drop shadow rather than the gradient fill because of the control over the blur and the
opacity. I just think it gives a more pleasing effect.
|
| Step 6 | Yes, but I still have that annoying problem of the drop shadow drooping down and the button making a line at the borders. Well, this is why we created this as an image which is 3 times as high as what we want. Now, go in and crop this to the full width, but only the center 100 pixels in height. The results are a border background which tiles seamlessly in the vertical with no annoying glitches at the edges. |
 |
Comments are appreciated. |
This page was last modified on 08/28/98 05:20 PM |