- Open a new image 200x200 with a black background. Add a new
layer [ALT + L; L]. Lets assume this is called Image1.
- Choose the Candy Corn picture tube which ships with PSP 6 or download
it from the JASC site.
- Set the scale to 50%.
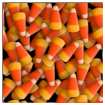
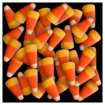 Begin to randomly place
candy pieces on the image one at a time. Be very careful not to go over and
edge. If you do, or if you don't like how a piece of candy "fell", just
hit "undo" [CTRL + Z] to remove the candy piece. Don't try to be too
"regular", but get an nice even filling without going across any edges. Do
this until the image is nicely full. You should have an image which resembles the
thumbnail to the right. (The white border is just added for clarity in presenting
the thumbnail on a black background.) Begin to randomly place
candy pieces on the image one at a time. Be very careful not to go over and
edge. If you do, or if you don't like how a piece of candy "fell", just
hit "undo" [CTRL + Z] to remove the candy piece. Don't try to be too
"regular", but get an nice even filling without going across any edges. Do
this until the image is nicely full. You should have an image which resembles the
thumbnail to the right. (The white border is just added for clarity in presenting
the thumbnail on a black background.)
- Download the file "base-for-selections".
Unzip it and open the image in PSP. This image will just look like a 200x200 black
square, but it has the selections needed for the next steps saved to the alpha
channel. I find this faster and easier to work with than having the selections saved
to the hard drive as *.sel files. If you chose to work with a file whose size is not
200x200, then you will need to create your own selections which divides the image into
quadrants and right and left and upper and lower planes. I find it best to do this
by double clicking the selection tool and entering the numeric values. If you use
the selection rectangle directly, be sure that there is no anti-aliasing or feathering.
- Open another file which is 200x200, black background and add a new
layer. Lets call this Image2.
- With Image1 active, from the selections pulldown choose "load
selection from alpha channel". [Alt +S; then O] There is a pulldown for
"Available Documents". Make sure that "base-for-selections" is
chosen. When presented with a list of choices for the alpha channel, select
"upper-left". Copy this selection [CTRL + C].
- With Image2 active, load a selection from the alpha channel, but
choose "lower-right".
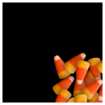
- Do a "paste into selection" [Shift + CTRL + L] Image2
should look like the thumbnail to the right.
- Repeat Step 7, but now choose "lower-right" for the alpha
channel on Image1.
- Repeat Step 8, but now choose "upper-left" for the
alpha channel on Image2.
- Repeat Step 9.
- Do Steps 7 - 9 for "upper-right" to "lower-left"
and "lower-left" to upper-right". You can do these quadrant exchanges
in any order,
 but it is best to develop a pattern so
you don't have to think to much about it. A thumbnail of Image2, at this stage, is
show at the right. Below is a list of how a quadrant in Image1 maps to a quadrant
in Image2. but it is best to develop a pattern so
you don't have to think to much about it. A thumbnail of Image2, at this stage, is
show at the right. Below is a list of how a quadrant in Image1 maps to a quadrant
in Image2.
- upper-left -> lower-right
- lower-right -> upper-left
- upper-right -> lower-left
- lower-left -> upper-right
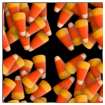
- In the thumbnail above, you can see that there is a big
"cross"
 in the center of the image
where. This corresponds to the edges in Image1 where we were trying to avoid placing
candy which covered a border. In this step, we need to go back and fill in the
holes. Again, avoid going over the edge, but don't be too "regular" in
placing the candy pieces. You may want to do this on another layer and then merge
the non-background layers so it is easier to get back to a "known" state if you
don't like what you come up with. <G> A thumbnail of the result is seen to the
right. Now, this seems to look pretty good, but I really wouldn't be happy with the
way it tiles. Go here to see what I mean. in the center of the image
where. This corresponds to the edges in Image1 where we were trying to avoid placing
candy which covered a border. In this step, we need to go back and fill in the
holes. Again, avoid going over the edge, but don't be too "regular" in
placing the candy pieces. You may want to do this on another layer and then merge
the non-background layers so it is easier to get back to a "known" state if you
don't like what you come up with. <G> A thumbnail of the result is seen to the
right. Now, this seems to look pretty good, but I really wouldn't be happy with the
way it tiles. Go here to see what I mean.
- If you used another layer in Step 14, merge it with the layer
immediately below, but not with the black background. You may want to repeat Steps 6
- 14 a few more times depending on how much seems to be "missing" from the
edges. I did another iteration, in this example. Whatever you end up with
becomes the "Image2" of the next steps.
- Open another file which is 200x200, black background and add a new
layer. Lets call this Image3.
- Using Image2, load the selection from the alpha channel called
"upper-half". Copy this selection.
- On Image3, load the selection from the alpha channel called
'lower-half".
- Do a paste into selection on Image3.
- Repeat Steps 17 - 19 for "lower-half" copied from Image2
and pasted into the "upper-half" of Image3.
- Open another file which is 200x200, black background and add a new
layer. Lets call this Image4.
- Using Image3, load the selection from the alpha channel called
"left-half". Copy this selection.
- On Image4, load the selection from the alpha channel called
'right-half".
- Do a paste into selection on Image4.
- Repeat Steps 22 - 24 for "right-half" copied from Image3
and pasted into the "left-half" of Image4.
- You may want to iterate on Steps 16 - 25 a few more times to get a
good tile in which the repeat is difficult to detect. The finished product is the
background tile on this page.
Notes: This example, using the Candy Corn tube from JASC, is
very vibrant, to say the least. There is no way to put content on top of this
background and maintain readability. I have chosen a table structure with very
simple horizontal rules for this tutorial. Other suggestions include using the tile
as part of a border background, making the tile the background for a frame structure with
buttons to link to other pages, or desaturating the tile so that text would show up.
I don't think the last option is a good choice for this particular tile, but I
wouldn't rule it out for other motifs. You can see another example of this technique
at "holidays"
page for my breeder.
Also, there would be no need of much of the manipulation in this and
the layered tiles tutorials if PSP supported "wraparound", as does Painter.
(Just my 2 cents worth of kvetching. <GGG>)
 E-mail me
with questions or comments. E-mail me
with questions or comments.
 Return to Visual
Sonnets Introduction. Return to Visual
Sonnets Introduction.
|