Please, see the Terms of Usage on the Sets page for use of graphics. Tutorials may not be reproduced without express written permission of the author.


 Weaving Tweed
In this tutorial, we will use Paint Shop Pro 5 and an Adobe PhotoShop filter to do the following:
- Create texture from random noise in a chosen band of hues.
- Transform that texture into tweed by using a filter which is available as part of the Adobe PhotoShop 4 demo download.
This tutorial builds on the texture creation techniques presented on the 2nd page of the Simple Faceted Gems tutorial.
And, yes, once again, there is nothing on this page that has been scanned. Everything is created in PSP 5 using dingbats and the textures described below processed with the Adobe plugin, BladePro and the MIC Impressionist filter.
 Be alert while installing the demo version (Save disabled) of
Adobe PhotoShop 4. I did a custom install because I did not want to have PS grab my
graphics file associations. During that custom install, I chose to only install the
plugins. Please, refer to the PSP 5 Users manual for the installation of plugins.
Be alert while installing the demo version (Save disabled) of
Adobe PhotoShop 4. I did a custom install because I did not want to have PS grab my
graphics file associations. During that custom install, I chose to only install the
plugins. Please, refer to the PSP 5 Users manual for the installation of plugins.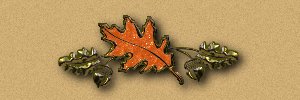
| Step 1 | Open a 200 x 200 image. |
| Step 2 | Add a layer called BG Fill. |
| Step 3 | Add another layer and flood fill with black. |
| Step 4 | Duplicate the black layer for as many additional hue variations you plan to have. Turn off the visibility for these duplicate layers until you are ready to use them. |
| Step 5 | Go to the lowest black layer and add 50% random noise. |
| Step 6 | Select all and modify the selection to set Black transparent with a tolerance of 35. |
| Step 7 | Promote the selection to a new layer called Dark Brown. Keep it selected. |
| Step 8 | Adjust the Hue Map sliders so that all of the hues are variations on orange. (Remember that brown is just orange with black added.) Make sure you do have some variations, however. |
| Step 9 | Select none and then blur with Soften More. |
| Step 10 | Repeat steps 5-9 for the upper black layer with these modifications:
|
| Step 11 | Delete the black layers with the random noise. |
| Step 12 | Go to the BG Fill layer and flood fill with a complementary color. I used HSL 30, 64, 128. Merge the top 3 layers. (You maight want to do the merge on a duplicate of your working master so that you can go back and "tweak" it if you choose.) |
| Step 13 | Apply the Adobe Rough Pastels filter. It should show up under Artistic Effects from the Plugins pulldown. I pretty much used the default setting with the texture changed to burlap. You might want to increase the relief a bit. |
 |
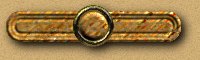
Now, you've woven your own tweed just in time for the first frost. (Meanwhile it is still in the 90's here in TX and its already October. <sigh>) |
 |
At left is a variation on the above in cool colors. The following
settings were used for steps 5-9:
|
 |
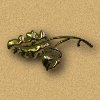
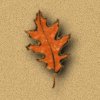
These techniques which involve manipulating the hue map can yield some
stunning results. I created a custom brush of an oak leave and acorn from the Ludlow
dingbats, and used this with a modification of the Pointillist Embossed Daubs to create a
setting which I applied to the texture obtained at Step 13. The results are at left,
and also used in the border background, etc. on this page. What is so striking is how beautifully coordinated the colors are. Remember, these are made from manipulating random noise! However, it is important to use some color sense when adjusting the hue map. If you are using different hue families, then try to keep the H and/or L relatively constant for each layer. This is what I did with the cool variation. If you are using one hue family, then you will want to vary the H and L between layers. OTOH, try different things since you never know what wonderful effect you may stumble upon. ;^) |
 E-mail me with any
questions or comments.
E-mail me with any
questions or comments.