
| Downloads | MySS Info | ToolKit Info | Register | Home | Features |
There are seven screen tabs on the Setup Screen. These links will take you to each screen.
The bold tab name above each screen shot
links back to the links above.
Use the links under the bold tab name to go directly
to that area of help.
Or you can click on the control in the screen shot.
Go to Screen Shot
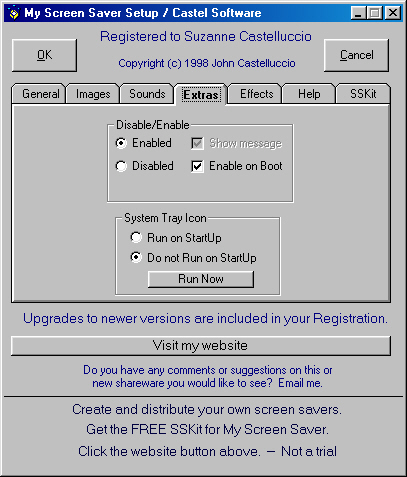
"Enabled" will allow My Screen Saver to run when Windows calls it. This is the default. This and the Disable option are also on the System Tray Icon menu.
"Disabled" will stop My Screen Saver from running when Windows calls it. If you temporarily want to prevent any screen saver from running, you would normally have to go into the Windows Control Panel and select none as your screen saver. This option let's you keep My Screen Saver selected there, but will disable it until you enable it again or reboot, if you select that option. If you've ever had a screen saver start at an inopportune time, you'll know why you might want to do this. This and the Enable option are also on the System Tray Icon menu.
"Show Message", if checked, will display a message that informs you that Windows tried to start My Screen Saver but you have it disabled.
"Enable on Boot", if checked, will re-enable My Screen Saver, whenever you reboot your PC.
"Run on Startup" will set up Myssrun.exe to run when you boot your machine. This will place the System Tray Icon in the System Tray. You do not need to place a shortcut in the Startup folder.
"Do not Run on Startup" will stop Myssrun.exe from running when you boot. This is the default.
"Run Now" will place the Icon in the System Tray.
Go to Screen Shot
The System Tray Icon will, when you click it (left button, single click), runs My Screen Saver. A right click will bring up a small menu -- Exit, Setup, Disable/Enable, Slideshow, Run, Website, Help.
"Exit" will remove the Icon from the Tray. Do this when you are installing or uninstalling software. When you are through the installation, if you don't have to reboot, you can simply run Myssrun.exe again.
"Setup" allows you to go into the My Screen Saver setup without going through the Control Panel.
"Disable/Enable" Toggles between enabling and disabling My Screen Saver. If it says Disable, then My Screen Saver is enabled and a click on Disable will disable My Screen Saver and change the menu to say Enable.
"Slideshow" runs My Screen Saver in slideshow mode. The Slideshow box does not have to be checked for the system Tray Icon Slideshow item to work. Until you change them, slideshow will use the same parameters that you have selected in Setup.
"Run", obviously runs My Screen Saver.
"Website" will take you to my website.
"Help" will bring up the first help file.
Go to Screen Shot
Overall:
"OK" will save your changes and exit the setup.
"Cancel" will discard your changes and exit setup. The "X" at the top right will also do this.
"Website" This button is a hyperlink to my website on the internet. If you are not on the internet, it should bring up your sign on screen. If it doesn't, then your PC settings need to be adjusted and that is beyond the scope of this help. If you are already signed onto the web, it will take you to my home page. From there you can check to see if you have the latest version of My Screen Saver. You can also check out the help pages. Eventually I will have a FAQ page, that you can check out. You can also see if I've managed to finish any new shareware.
"Start up Delay" There is a built in delay of approximately 20 seconds when the Screen Saver first starts and after the Password or Ask On Exit screens are canceled. During this 20 seconds, all mouse action and keyboard activity is ignored. This is to give you time to move your hand away from the mouse or keyboard.
Go to Screen Shot
| Downloads | MySS Info | ToolKit Info | Register | Home | Features |
Copyright 1999 John Castelluccio