
| Downloads | MySS Info | ToolKit Info | Register | Home | Features |
Go to Screen Shot
There are seven screen tabs on the Setup Screen. These links will take you to each screen.
The bold tab name above each screen shot
links back to the links above.
Use the links under the bold tab name to go directly
to that area of help.
Or you can click on the control in the screen shot.
Go to Screen Shot
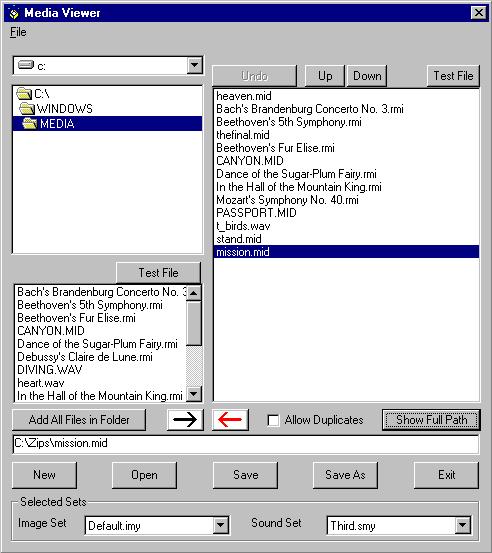
Sound Sets: Each Sound Set contains the path to each file, therefore you can include files from anywhere on your system. They do not need to be in the same folder.
"Drive Box" Sets the drive on your system.
"Folders" Sets the folder on your system. Double click a folder to make it current.
"File Box" displays the files with valid Sound extensions in the current folder. Double click a file to include it in the current set. If the file is a valid Sound file, double click will also show the full path in the message box below. If it is not a valid Sound file, it will not be added to the set and an error message will show in the message box.
"Included Files" This shows the Sound files in the current set. Double click a file to remove it from the set. See Undo below.
"Message Box" This shows the path of the selected Sound file or any messages that are necessary.
"Selected Sets" Select the Image and/or Sound Sets to be used by My Screen Saver.
"Image Set" Select the Image set to be used by My Screen Saver.
"Sound Set" Select the Sound set to be used by My Screen Saver.
Go to Screen Shot
"Test File (A)" Plays the highlighted File Box file. The file path will be displayed in the Message Box. If you don't hear it, it is probably not a valid sound file.
"Undo" When active, restores the last file removed from the current Sound Set. Only one level of Undo is available.
"Up" In the Included Files Box, moves the highlighted file up one position. The Sounds are played in the order of the set. You set this order by using the Up and Down buttons.
"Down" In the Included Files Box, moves the highlighted file down one position. The Sounds are played in the order of the set. You set this order by using the Up and Down buttons.
"Test File (B)" Plays the highlighted Included File file. The file path will be displayed in the Message Box. If you don't hear it, it is probably not a valid sound file.
"Add All" Adds all of the valid Sound files from the File Box to the current set. Any message displayed will refer to the last file.
"Arrow Right" This is the arrow on the LEFT which points RIGHT. This adds the highlighted File Box file to the current set. The full path will be shown in the message box.
"Arrow Left" This is the arrow on the RIGHT which points LEFT. This removes the Included File file from the current set. This will also make the Undo button available.
"Show Full Path" This will toggle between showing the file name only and the full path of the files in the Included File Box. If the path is too long, you may not be able to see the entire path. In this case, simply highlight the file and the path will be shown in the Message Box.
Allow Duplicates" When checked you will be able to select the same file more than once. The default is that duplicates cannot be added to the Sound Set.
Go to Screen Shot
"New" This clears the current data for a new Sound Set. If you have done anything with the current data since it was last saved, you will be prompted to save it before it clears the current data.
"Open" This presents a selection box with all available Sound Sets on your system. Select the set you want and click OK, or double click the file. This should include a Default set that comes with My Screen Saver. If you have done anything with the current data since it was last saved, you will be prompted to save it before it prompts you for the file.
"Save" Saves the current Sound Set. If it is not yet named, it is the same as "Save As".
"Save As" This presents a selection box with all available Sound Sets on your system. Select the set you want and click OK, or double click the file, or type a name for the set. If you select a set that is different than the current set it will prompt for confirmation to overwrite the old set.
"Exit" This exits Sound Set edit. If you have done anything with the current data since it was last saved, you will be prompted to save it.
Go to Screen Shot
| Downloads | MySS Info | ToolKit Info | Register | Home | Features |
Copyright 1999 John Castelluccio