
Castel Software
Customize Display
Screen Shot
Cycle
Setup
Go to Screen Shot
"Cycle Grid" Grid to enter your
cycle parameters. If you have more lines then the grid will show, a
scrollbar will appear to allow you to see all of the lines. When first
installed, My Screen Saver will default to show a certain amount of images,
on screen, at once. It will show this number repeatedly. When
you select a cycle on the General Tab screen,
the displays you select will appear in the order you have here. When
it reaches the last display, My Screen Saver will start over from the top.
"Help Button" Displays a brief explanation of what to
enter in the cycle grid.
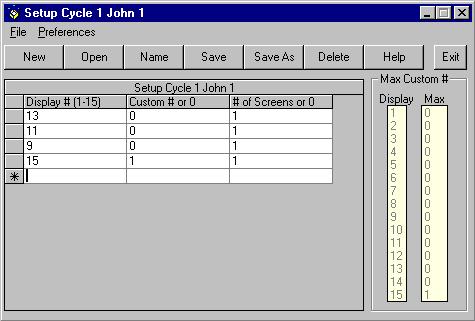
For example, if I have Cycle 1, as depicted in the screen shot, selected,
it will first show 13 (Display # 13) images using the default display (Custom
# 0) and show 1 (Screens 1) screens or 13 images total. Next, it will
show 11 (Display # 11) images using the default display (Custom # 0) and
show 1 (Screens 1) screens or 11 images total. Next, it will show 9
(Display # 9) images using the default display (Custom # 0) and show 1 (Screens
1) screen or 9 images total. Last, it will show 15 (Display # 15) images
using custom # 1 (Custom # 1) and show 1 (Screens 1) screens or 15 images
total. After that, it will start over and repeat this cycle indefinitely.
Go to Screen Shot
-
"Header" Area at the top that displays the name of the
current cycle.
-
"Display #" Enter the display # that you want to appear
in My Screen Saver. When you select a cycle on the
General Tab screen, the displays you select
will appear in the order you have here. When it reaches the last display,
My Screen Saver will start over from the top. In the screen shot, cycle
1 will display 13 images, 11 images, then 9 images, then 15 images and then
start over with 13. You must enter a number between 1 and 15.
-
"Custom #" This indicates the custom display that will
be displayed. A zero (0) means to display the default that comes with
My Screen Saver. You can setup custom displays by clicking the button
"Customize Displays" on the
General Tab screen. You can select up
to the number in the Max Box beside the display # you
have selected. In the screen shot cycle 1 will display the default
display for the 13, 11 and 9 images and custom display 1 for the 15 images.
Note that for for all displays except 15, only the default display
can be selected because no custom displays have been set up as shown by the
0 in the Max Box. You can leave this column blank
and it will be filled in for you with a zero.
-
"Screens" This indicates the number of screens that
will be shown for this display. A zero (0) means to display enough
screens to show all of the image files in the image set you have selected,
at least once. For example, assume you have selected display
#10 and you set this to zero. If, in your image set, there are 31 image
files, My Screen Saver will show four screens or 40 images. You can
leave this column blank and it will be filled in for you with a zero.
-
"* New line" The line with an asterisk on the left
is where you can add new lines to your cycle. Simply start typing on
this line.
Go to Screen Shot
"Max Sub Values" Shows the displays and the
number of customs available for the displays.
-
"Display Box" Shows the displays available. (1 through
15)
-
"Max Box" Shows the number of customs available for the displays listed in
the Display Box.
"Menu Items" Drop down menus as below:
-
"File"
-
"New" Clears the grid and sets up for a new cycle.
This is the default when you first enter Cycle Setup.
-
"Open" This allows you to load a cycle that you have already
setup to edit it or to change it and save as another cycle. Shows a
menu list.
-
"Name" This allows you to name each cycle. If you
don't name a cycle, when you save it, you will be prompted for a name.
But if the cycle already has a name, you will not be prompted.
-
"Save" This saves the current cycle. If you started
with a blank new form, this will save the cycle as the next one in order.
If you have Confirm Save checked, a small box will
confirm that it has been saved.
-
"Save As" This allows you to save the current cycle
as any cycle # that you have or as the next cycle. Shows a menu list.
If you have Confirm Save checked, a small box will
confirm that it has been saved.
-
"Delete" This allows you to delete any cycle that you
have. This does not effect the cycle that you currently have open .
Shows a menu list.
-
"Cancel" This ends cycle setup. It will not
prompt you for a save even if you have your
preferences set for that.
-
"Exit" This ends cycle setup. If your
preferences are not set to
prompt you for a save, it will not do so and if you
have not saved the current cycle, you will lose it.
Go to Screen Shot
-
"Preferences" These settings are shared
with Custom Display Setup.
-
"Prompt for Save" When checked the program will prompt
you to save the current cycle when you attempt to exit or open a new
cycle. This will occur all of the time. If you don't want this,
uncheck the selection by clicking it. This setting is shared with Custom
Display Setup. A change in one place effects both.
-
"Confirm Save" When checked the program will confirm
each save you make. If you don't want this, uncheck the selection by
clicking it. This setting is shared with Custom Display Setup. A change
in one place effects both.
Customize Display
| Go to Screen Shot
Copyright 1998-1999 John Castelluccio