
Castel Software
Cycle Setup Screen
Shot
Custom Displays
Go to Screen Shot
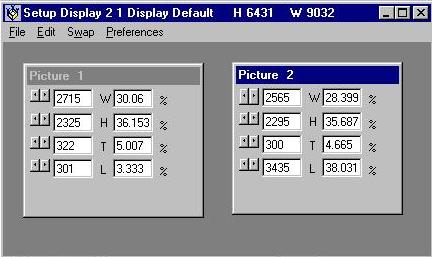
"Overview" This is where you can set up your own custom
displays. You can set the size and positions of the images that will
be displayed when this custom is selected. When this first opens it
will show you the default display for the display # that is selected on the
Main Setup screen. At the top, in the blue
area it will say something similar to this
"Setup Display 2 1 Display Default H 6431 W 9032"
-
"Setup Display 2 1" means that the setup you are currently looking at is
Display #2 Custom 1. The custom number at this point is one more than
the total customs you have for display #2. When you have a custom displayed
this will be the number of the custom.
-
"Display Default" is the actual caption that will be shown at the top of
My Screen Saver if you check the Show Names box on the
Main Setup screen. The word Display is
a constant. The name of the custom is currently Default. If you
try to save this, you will be prompted for a name to replace the word Default.
-
"H 6431 W 9032" is the actual size of the box that contains the display.
This is in twips. Twips differ between monitors and between screen
resolutions on the same monitor. Therefore it is impossible to tell
you exactly the size of a twip. Suffice it to say that this is the
way I am able to program My Screen Saver for many different monitors and
screen resolutions. If you want to see the actual size of a twip on
your monitor, simply change one of the numbers in one of the image boxes
on your screen. You'll see that a twip is very small.
-
The picture boxes represent the area of the screen
that a displayed picture will occupy. In each box are four lines of
controls. These lines control, as indicated by the letters W,H,T,L,
the Width, Height, Top and Left edge of that box. At the left of each
line is a small scroll bar which will control the values in the boxes.
This is for those of you who insist that you do not want to use the
keyboard. When one of these is active you may notice that the its height
is a little bigger than the others. The center input box is the actual
value of that line in twips. The second input box is the percentage
of the total screen for the value in the first box. The percentage
is the value that is actually saved. This allows you to change your
screen resolution and still have the displays fit the screen.
-
All of these boxes can be edited individually which will change the position,
width or height of the picture box. The position and/or dimensions
will not change until you either tab out of the box or move the cursor over
the box. For you non-keyboarders, the position can be changed by dragging
the blue area of the box, just as in Windows. Also as in Windows, if
you put the cursor at the edge of a box it will display a double arrow and
you can then change the dimensions. At the top of each picture box,
is the word Picture followed by a number. This is the order in which
the pictures will be displayed. You can move each picture or use the
Swap menu option below to move them.
-
A right click on a picture box will display the File
menu.
-
A right click in a blank area of the screen will display the
Swap menu.
Go to Screen Shot
"Menu Items" Drop down menus as below:
-
"File"
-
A right click on a picture box will display the File menu.
-
"Open" This allows you to load the default display or
a custom that you have already setup to edit it or to change it and save
as another custom. Shows a menu list.
-
"Name Display" This allows you to name each custom
display. If you don't name a display, when you save it, you will be
prompted for a name. But if the display already has a name, you will
not be prompted.
-
"Save" This saves the current display. If you started
with the default display, this will save the custom as the next one in
order. If you have Confirm Save checked, a small
box will confirm that it has been saved.
-
"Save As" This allows you to save the current display
as any custom # that you have or as the next custom. Shows a menu list.
If you have Confirm Save checked, a small box will
confirm that it has been saved.
-
"Delete" This allows you to delete any custom that you
have. This does not effect the custom that you currently have open
. If you delete the current custom, the settings will remain on the screen
and you will be able to save it as if you had started with the default. Shows
a menu list.
-
"Exit" This ends custom display setup. If your
preferences are not set to
prompt you for a save, it will not do so and if you
have not saved the current custom display, you will lose it.
Go to Screen Shot
-
"Edit"
-
"Mass" Allows you to edit one element of all of the pictures
at once. This item shows a sub-menu as below:
-
Top
-
Left
-
Width
-
Height
-
When you click one of the sub-menu items an input form will appear.
Two option buttons are available. "Add/Subtract"
and "Replace". You can only select one of
these. By default when you select Top or Left, the Add/Subtract option
is selected and Replace is not available. When you select Width or
Height the Replace option is selected but Add/Subtract is available.
-
"Add/Subtract" The value entered will be added to the value
in each picture box. Enter a negative value (-10) to subtract.
-
"Replace" The value entered will replace the value
in the picture boxes.
-
"Copy" The highlighted text will be copied to the
clipboard. If nothing is highlighted this clears the clipboard.
-
"Paste" The contents of the clipboard will be pasted
at the cursor position. If anything is highlighted, it will be deleted.
Go to Screen Shot
-
"Swap" A right click in a blank area
of the screen will display the Swap menu. At the top of each picture
box, is the word Picture followed by a number. This is the order in
which the pictures will be displayed. Use Swap to switch the positions
of two of the boxes. For example the default display for 13 has the
first picture in the upper left corner of the screen and the 13th in the
center. To switch these, click Swap, then Swap 1, then With 13.
You must always select the lower number first.
Go to Screen Shot
-
"Preferences" These
settings are shared with Cycle Setup.
-
"Prompt for Save" When checked the program will prompt
you to save the current display, when you attempt to exit or open a new
display. This will occur all of the time. If you don't want this,
uncheck the selection by clicking it. This setting is shared with Cycle Setup.
A change in one place effects both.
-
"Confirm Save" When checked the program will confirm
each save you make. If you don't want this, uncheck the selection by
clicking it. This setting is shared with Cycle Setup. A change in one
place effects both.
Cycle Setup | Go to
Screen Shot
Top
Copyright 1999 John Castelluccio