

Let me explain the concept of a picture tube. Think of it this way. When you decorate a cake, you can use cake decorating tubes that allow you to make your decorations either larger or smaller by how much of an opening you allow with your tube when applying your icing to your cake. Paint Shop Pro tubes work the same way. You are using tubes filled with graphics and applying them on another graphic image as you do with your cake. With Paint Shop Pro tubes, you can manipulate your graphic size making it either larger or smaller depending on your needs.
There are numerous wonderful pre-made Paint Shop Pro 5 and 6 picture tubes available throughout the internet. Here are some simple instructions to use and enjoy tubes!
Requirements for Downloading : You must have Paint Shop Pro 5 or higher and a Winzip program or comparable to unzip them.
You will set up two folders. In your C Drive set up a folder and called it temp. This is where you will store your downloaded tube zip files. Also set up a Special Folder to Unzip Your Tubes: On your desktop you will add a folder called Tubes ? this will be the place where your tube folders will be unzipped.
Downloading:
Choose the tube file or files you wish to download
After downloading them ? go to Winzip and when it asks where to unzip them
choose the new folder on your desktop called Tubes
Now comes the fun part ? Open up your Paint Shop Pro Program and be at your Paint Shop Pro desktop.
Now go to your tubes file that you set up on on your computer desktop and open it up. Take one of the files that you downloaded and drag it to the Paint Shop Pro desktop.
Look at the tube and its contents and see how many cells are filled across and down.
Then go to file ? export picture tube
Fill in the number of cells going down and the cells going across and be sure to name the file and then hit save.
The file is now stored in your Paint Shop Pro 5 or 6 Tubes file.
Using Tubes:
Open a new image
Click on the tubes icon (the pen and clip symbol) on the side panel (six from bottom) and the toggle control panel at the top.
Tube Tool

Control Panel
You can make your tube images any size you desire ? just move the scale up or down depending on the size of the image you want to apply. Once you have your tube image chosen, just left click on the graphic you are applying this tube to and voila - your image has been applied. If your tube image is too large - hit the undo key and scale it down or if it is too small scale it up and reapply it!
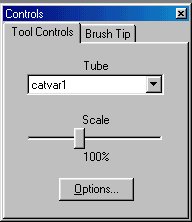
Paint Shop Pro 5
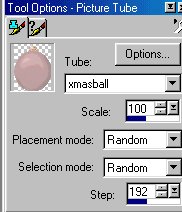
Paint Shop Pro 6
Deleting Tubes: (This doesn't apply to Paint Shop Pro 6 Version.) In the 6 version there is no tubes.ctl file.
If you no longer need a tube and want to delete it you first will need to go to my computer ? Program Files, Paintshop Pro 5, Tubes and delete the tube file. But you will also need to delete the corresponding tubes.ctl file ? if you don?t, you will still see the listed tube although it won?t work.
To delete the tubes.ctl file go to Start ? Programs ? Accessories ? Word Pad. At Word Pad open up Program Files, Paintshop Pro 5, Tubes making sure that your files are set to find all files. Then look for Tubes.ctl file and open it up. Go through the listing until you find your file name that you have deleted and also delete the corresponding verbage. Then hit file save. Now the entire tube file will be deleted.
To delete a tube in Paint Shop Pro 6 - go to my computer - Program Files, Paintshop Pro 6, Tubes and just delete the tube.
ASSIGNMENT: Download this tube file. Make a background graphic and tile it and make a border graphic using this tube.
Once you get hooked on tubes, there is a terrific newsgroup that has wonderful information, tubes to download, links to tubes and Paint Shop Pro tutorial sites! Just click this link:
Annex Cafe PSP Tubes
The lessons should be done in this order:
 Introduction to Paint Shop Pro Classes
Backgrounds
Transparency
Flood Fill
Text Effects
Tubes
Snowglobe
Navigational Buttons